Survival Simulator
Written August 20, 2022 • Last edited August 23, 2022
Intro
This project started out as a rough 2D physics simulation since I wanted to create something using SFML. I hadn't had a personal project in a while and gained a lot more programming experience and fundamental knowledge since high school, so I was curious to see what I could put together going into my junior year.
This sums up how the basic physics works:
Entity.h
class Entity {
    protected:
        int id;

        float length; // side length or radius
        float mass;
        sf::Vector2f pos;
        sf::Vector2f vel;
        sf::Vector2f acc;

        float elasticity;
    ...
}
Entity.cpp
void Entity::update(std::set<Entity *> *closeEntities) {
    ...
    // Get delta time
    lastTime = currTime;
    currTime = c.getElapsedTime().asSeconds();
    dt = currTime - lastTime;

    // Update velocity
    vel += acc * dt;
    ...
}

void Entity::advance() {
    // Update position
    pos += vel * dt;
}
Standard kinematics. These two functions are called every frame (loop), and the change is normalized by dt or "delta time," so even if the time between frames isn't uniform, the amount of physics simulated will still be correct for the instant it does render. It might just skip more or less in the timeline.
Velocities after a collision are computed using the conservation of momentum formula:
Utils.cpp
// Computes the final velocity of object 1 (https://stackoverflow.com/questions/31620730/2d-elastic-collision-with-sfml)
sf::Vector2f computeCollision(sf::Vector2f p1, sf::Vector2f p2, sf::Vector2f v1, sf::Vector2f v2, float m1, float m2) {
      return v1 - (((2 * m2) / (m1 + m2)) * (dot(v1 - v2, p1 - p2) / pow(magnitude(p2 - p1), 2)) * (p1 - p2));
}
When balls bounce off walls or each other, the elasticity determines what percent of its speed it will retain after the calculation. It's a bit lazy, but it's essentially the same thing.
The biggest problem was the collision handling. It takes a lot to do it right—especially when the game is laggy or the objects are tiny—but I settled for "good enough" for this project since it wasn't serious. I won't put any of my code here since it's long and messy, but this video is a really nice resource to learn more.
This was my progress at the end of the first day:
Using this 2D physics engine, I originally wanted to create a program that simulated AI interacting with each other, inspired by this guy's ant simulation (which he has a great set of videos on, by the way). Then I had the idea to recreate an old game I made in 10th grade as well, so this idea evolved into a mix of both: a "survive as long as you can" top-down shooter with improved AI and a mode where you can watch the AI fight amongst themselves.
In addition to a far superior (relatively) physics engine and graphics library, this adaptation would feature more, cooler weapons and a larger variety of enemies with smarter AI instead of the previous random movements. I also added new systems such as projectile ricochet, weapon upgrading, and inventories.
Unfortunately, I had to abandon the project. Halfway through implementing collisions between lines and circles for walls—which was getting kind of messy—I had to leave for a few weeks, and I was away for too long. It was hard to pick back up, summer was coming to an end, and I wasn't interested in continuing the project without such a key feature.
Now what?
Well, I might look to return to it in the future since I was pretty excited to flesh out the ideas I planned, and I do find that aspect of game development very enjoyable—just getting to add whatever new things you can think of into your environment and seeing them work. The problem is that without a good foundation (like an actual game engine), you're stuck constantly having to return to it to fix limitations rather than being able to jump into the interesting stuff that builds upon it. Since I made the physics here just for fun and to learn, I may try using something like Unity 2D next time if I want to get serious, or I could just implement the rest of the features and AI and forgo the walls and proper collision handling.
For now though, you can check out the repository if you're interested in the code itself and how a game might look (the latest commit is in the wip branch and the source files are in Survival-Simulator/Survival-Simulator) or even try the executable (Survival-Simulator.exe), but I'll be sharing some of my favorite applications and snippets in this post.
Some cool tricks I used
This is nothing new, but I did find this optimization to be cool. When constantly checking for collisions between every entity, you're left with a horrible O(n^2)-like operation (a complete graph where each node is an entity and each edge represents a check means at least n*(n-1) / 2 checks for n entities—not ideal).
To reduce the number of checks, we keep track of which entities can possibly be close enough to collide by comparing how close their x-positions are. If two entities do not share a close x-position, then they shouldn't be considered at all for the more expensive collision check. It's called the sweep and prune algorithm, and my implementation is pretty questionable so I won't showcase it here, but this video (again) does a great job illustrating it.
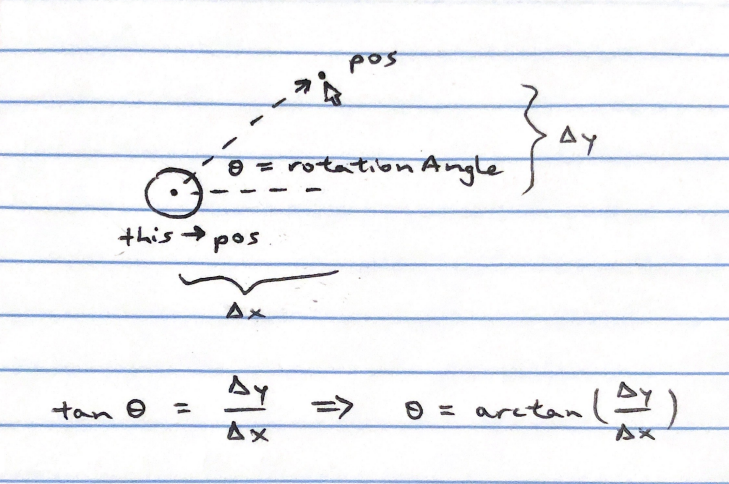
Here was an annoying problem: having the player's direction correctly following the mouse. Doesn't seem so bad, right? Every frame, just get the relative position vector from the player to the cursor, find the absolute angle (where "0°" is to the right and "positive" is counter-clockwise), and set the player to face that way:

main.cpp
sf::Vector2i mousePos = sf::Mouse::getPosition(window);
player->rotateTo(mousePos);
Player.cpp
void Player::rotateTo(sf::Vector2i pos) {
    relativePos = { (float)pos.x - this->pos.x, (float)pos.y - this->pos.y };
    if(relativePos.x != 0) rotationAngle = atan(relativePos.y / relativePos.x) * 180 / M_PI;
}
However, that yields something like this:
This is because in the left two quadrants relative to the player, the result of y/(-x) and -y/(-x) is indistinguishable from the right two quadrants' -y/x and y/x, respectively, so the result of atan is as if it were in the opposite quadrant. The longer math explanation is coming up.
Notice that the last step in the drawing above subtly suggests that arctan(tan(θ)) = θ without any restriction. This is a very incorrect statement. tan has multiple ways to get the same output (also referred to as not being "one-to-one" or "injective"), so when considering its inverse, arctan, there is loss of information.
For example, if the player is looking directly right, at 0°, then y = 0 and x can be any nonzero distance away—you're still looking directly right—thus the tangent of the angle the player is facing is tan(0°) = y/x = 0/x = 0. If the player is looking directly left, at 180° (or -180°), then y = 0 and x is any nonzero opposite distance away, so tan(180°) = y/(-x) = 0/(-x) = 0. Let's incorrectly assume arctan(tan(θ)) = θ simply because they are inverses. From this, we have proven that 0° = arctan(tan(0°)) = arctan(0) = arctan(tan(180°)) = 180°, which is clearly false.
Note: It is actually true that
tan(arctan(θ)) = θin all cases, but not the other way around.
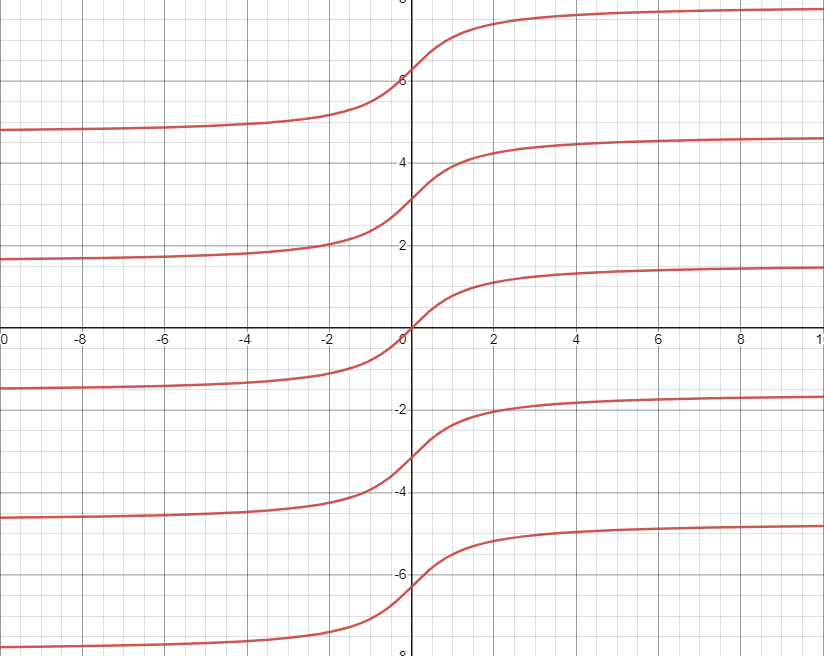
This is where the problem lies—there can't be multiple values of arctan(θ) mapped to a single θ (i.e., it wouldn't be a function by definition) like this:

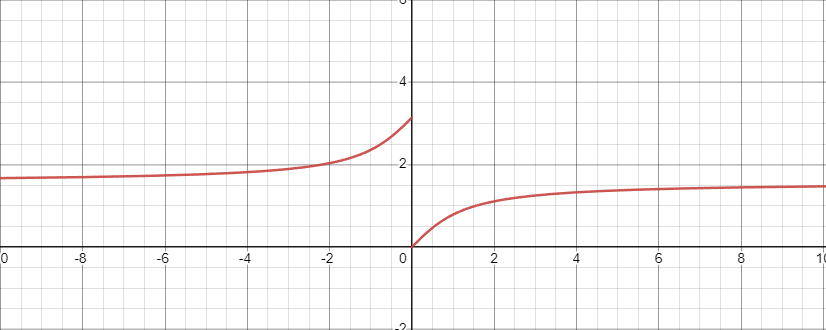
For this reason, mathematicians have agreed that the range (output) of the arctan function should only be between -90° and 90°, exclusive, which is why the player rotation worked on just the right side (i.e., this is the interval on which arctan(tan(θ)) = θ is true). It's somewhat arbitrary because any period of 180° would also avoid overlap, but this interval leaves a nice continuous curve right around the origin. Had they instead decided the range should be restricted between 0° and 180°, exclusive, the player rotation would only work on the top half.

Luckily, since I had run into this issue many times with sensors in robotics, I knew there was a simple solution: add the proper angle offset where it "snaps back" in order to create a smooth transition around the circle. In this case, we can add 180° to the output angle if the relative x-position is negative:
Player.cpp
void Player::rotateTo(sf::Vector2i pos) {
    relativePos = { (float)pos.x - this->pos.x, (float)pos.y - this->pos.y };
    if(relativePos.x != 0) rotationAngle = atan(relativePos.y / relativePos.x) * 180 / M_PI;
    if(relativePos.x < 0) rotationAngle += 180; // arctan only defined from -pi/2 to pi/2
}
This one is kind of obvious, but I thought it was a detail worth mentioning. The order in which you render each component determines which one will overlap the other, so I had to be mindful of that. Render the HUD elements over everything else by drawing them last:
main.cpp
for(it = entities.begin(); it != entities.end(); it++) {
    ...
    // Render the scene
    (*it)->draw(window);
}
...
player->getWeapon()->draw(window);
player->drawHealthBar(window);
info.setString(player->getInfo());
window.draw(info);

// Display on screen
window.display();
Here is the other weapon I got around to implementing. The name was inspired by the "Smart Pistol" from Titanfall, which automatically locks on to targets in the sights. I wanted to test out homing bullets, which could be used for similar features such as seeking missiles (more on that later) and zombie-like enemies that blindly follow the player but much slower:
Basically this works by finding the relative position vector between the bullet and the cursor and constantly sets the velocity vector to some multiple of that (it's 2.5x faster with the upgrade for quicker direction changes):
SmartBullet.cpp
void SmartBullet::update(std::set<Entity *> *closeEntities) {
    ...
    // Update velocity
    mousePos = sf::Mouse::getPosition(*window);
    vel = sf::Vector2f{ mousePos.x - pos.x, mousePos.y - pos.y } * 2.0f;
    if(((upgrades >> 4) & 1) == 1) vel *= 2.5f;
    ...
}
For something heavier like missiles, we can simulate the projectile's weight by updating the acceleration vector to the direction of the position vector instead of the velocity directly, giving the illusion of inertia. This also makes the control weaker and more drift-y:
SmartBullet.cpp
void SmartBullet::update(std::set<Entity *> *closeEntities) {
    ...
    // Update acceleration (tracking mouse position)
    mousePos = sf::Mouse::getPosition(*window);
    acc = unit(sf::Vector2f{ mousePos.x - pos.x, mousePos.y - pos.y }) * 500.0f;
    ...
}
This is one of my favorites. I always love a good application of bit manipulation, and what better way to use bits than to act as a bunch of related bools and save memory? For my weapon upgrade system, each Weapon has a class variable int weaponUpgrades that I could attribute each bit of (up to 32) to a modification of one of the weapon's stats. When updating the state of the weapon, I could perform checks such as
Pistol.cpp
Pistol::Pistol(...) {
    ...
    if(((weaponUpgrades >> 0) & 1) == 1) ammo = 15;
}

void Pistol::update() {
    if(((weaponUpgrades >> 0) & 1) == 1) maxAmmo = 15;
    if(((weaponUpgrades >> 2) & 1) == 1) attackSpeed = 0.45f;
    if(((weaponUpgrades >> 3) & 1) == 1) reloadSpeed = 1.45f;
    ...
}

void Pistol::altfire(std::list<Entity *> *e) {
    if(((weaponUpgrades >> 4) & 1) == 1)
    ...
}

void Pistol::draw(sf::RenderWindow& window) {
    ...
    // Laser sight
    if(((weaponUpgrades >> 1) & 1) == 1) {
        sf::Vertex line[] =
        {
            sf::Vertex(barrelPos, sf::Color(255, 0, 0, 175)),
            sf::Vertex(barrelPos + 1000.0f * unit(userRelPos), sf::Color::Transparent)
        };
        window.draw(line, 2, sf::Lines);
    }
    ...
}
to override the default values or run additional code. This also meant each instance of a weapon could be created with whatever combination of upgrades simply by passing that unique weaponUpgrades value.
For example: 15 => 00...01111 => (from right to left) yes increased ammo, yes laser sight, yes increased fire rate, yes increased reload speed, no burst fire.
Finally, just a smaller one, but I liked being able to use a transparent gradient, seen in the laser sight code snippet above, to simulate "effective range" for weapon classes. Pistol lasers would fade out closer than rifle lasers and thus would make it harder to aim farther. All I had to do was pick a point at which transparency would be at its maximum (1000.0f pixels away in the pistol's case—maybe too far) and let the gradient work its magic:

Data structures used in the real world!
This is a brief showcase of data structures I learned about but never personally used in practice until this project.
The trail effect on high-velocity objects is implemented using a queue. The last 19 drawn positions are stored and rendered, the first of which gets discarded the next frame:
Ball.h
class Ball : public Entity {
    protected:
        std::deque<sf::CircleShape *> trail;
    ...
}
Ball.cpp
void Ball::update(std::set<Entity *> *closeEntities) {
    ...
    // Add trail to ball
    sf::CircleShape *trailCirc = new sf::CircleShape(radius);
    trailCirc->setFillColor(sf::Color(color.r, color.g, color.b, 50));
    trailCirc->setOrigin(radius, radius);
    trailCirc->setPosition(pos);

    trail.push_back(trailCirc);
    if(trail.size() >= 20) {
        trailCirc = *trail.begin();
        trail.pop_front();
        delete trailCirc;
    }
}
The inventory system was easily implemented using a doubly-linked list:
Player.h
class Player : public Entity {
    protected:
        std::list<Weapon *> inventory;
        std::list<Weapon *>::iterator invIt;
    ...
}
Player.cpp
void Player::inventoryNext() {
    if(!(*invIt)->reloading) {
        invIt++;
        if(invIt == inventory.end()) invIt = inventory.begin();
    }
}

void Player::inventoryPrev() {
    if(!(*invIt)->reloading) {
        if(invIt == inventory.begin()) invIt = inventory.end();
        invIt--;
    }
}
main.cpp
// Access inventory
if(event.type == sf::Event::MouseWheelScrolled) {
    if(event.mouseWheelScroll.delta > 0) player->inventoryNext();
    else player->inventoryPrev();
}
Conclusion
This has been my largest project so far despite being abandoned, and I had a lot to share, albeit from my perspective as a learning developer—maybe for my future self to look back on. If you took the time to actually read through this post, I appreciate it, and I hope you found something here as interesting as I thought it was.